A problem that looked simple at first but turned out to be more interesting because the data we dealt with was huge.
Continue readingData-Intensive Problem

A problem that looked simple at first but turned out to be more interesting because the data we dealt with was huge.
Continue reading
If you like working with command-line tools you should work on *nix system. But if your work requires you to work on Windows like me you may find it helpful reading this post.
Continue reading
Photo by Caspar Camille Rubin on Unsplash
In this post, I want to share a pattern that helps in configure/construct a service. You can see the final result code first for easier to get the context
package main
import (
"time"
"github.com/jkaveri/fluent-option/fluentcache"
)
func main() {
connection := "localhost"
password := "JA$2mAe%1@s5"
db := 0
readTimeout := 2 * time.Second
writeTimeout := 2 * time.Second
dialTimeout := 5 * time.Second
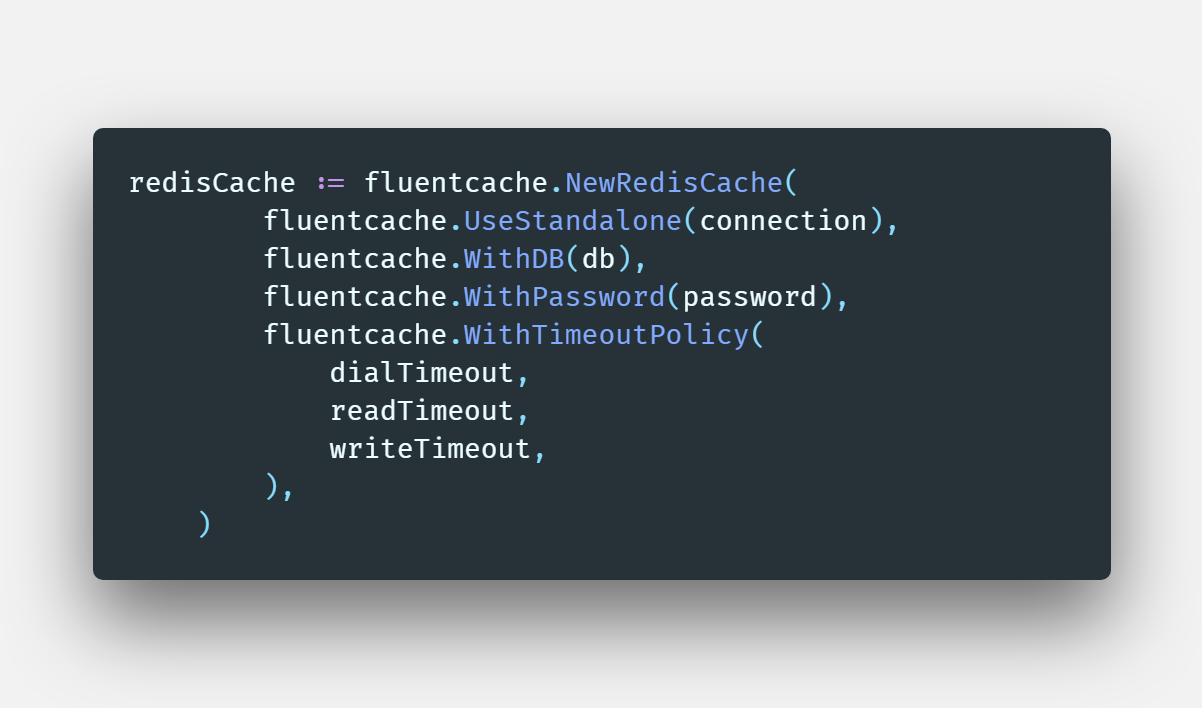
// Configure redis cache fluent
redisCache := fluentcache.NewRedisCache(
fluentcache.UseStandalone(connection),
fluentcache.WithDB(db),
fluentcache.WithPassword(password),
fluentcache.WithTimeoutPolicy(
dialTimeout,
readTimeout,
writeTimeout,
),
)
// set key
_ = redisCache.Set("my_key", "my_value")
}
When design API in Golang I usually create a function that helps to configure the service.
// cache/cache.go
package cache

type RedisCache struct {
	connection string
	db         int
	password   string
}

// RedisCache create new redis cache
func NewRedisCache(connection, password string, db int) *RedisCache {
	return &RedisCache{
		connection: connection,
		password:   password,
		db:         db,
	}
}

func (*RedisCache) Set(key, value string) error {
	return nil
}

func (*RedisCache) Get(key string) (string, error) {
	return "", nil
}
I skipped some implementation detail to keep the code simple, you only need to focus the NewRedisCache function
Then I can init my RedisCache like this:
// main.go
package main

import "github.com/jkaveri/fluent-option/cache"

func main() {
	connection := "localhost"
	password := "JA$2mAe%1@s5"
	db := 0

	redisCache := cache.NewRedisCache(connection, password, 0)

	// set key
	_ = redisCache.Set("my_key", "my_value")
}
The configure looks good enough and I started to use that configure function in many places. Unfortunately, I was got a problem when I want to add more argument into the configure function because of I want to add more feature for my service, the problems are:
Experience tells us that defaulted arguments make it too easy to patch over API design flaws by adding more arguments, resulting in too many arguments with interactions that are difficult to disentangle or even understand – Go at Google: Language Design in the Service of Software Engineering
Experience with other languages told us that having a variety of methods with the same name but different signatures was occasionally useful but that it could also be confusing and fragile in practice – Why does Go not support overloading of methods and operators?
So we only have these options:
Add new arguments into existing function and update existing code. This option is worse because of that impact on the existing code. Furthermore, in case your API is the dependency of other packages and this option can is a breaking change
// cachev2.go
package cachev2

import "time"

type RedisCache struct {
    connection string
    db         int
    password   string

    maxRetries      int
    minRetryBackoff time.Duration
    maxRetryBackoff time.Duration
}

// RedisCache create new redis cache
func NewRedisCache(
    connection, password string,
    db, maxRetries int,
    minRetryBackoff, maxRetryBackoff time.Duration,
) *RedisCache {

    return &RedisCache{
        connection:      connection,
        password:        password,
        db:              db,
        maxRetries:      maxRetries,
        minRetryBackoff: minRetryBackoff,
        maxRetryBackoff: maxRetryBackoff,
    }
}

func (*RedisCache) Set(key, value string) error {
    return nil
}

func (*RedisCache) Get(key string) (string, error) {
    return "", nil
}
Create a new function with meaning name, creating a new function makes sense but what if we will need more arguments in future? Of course, you can say we need compliance with YAGNI, but sometimes if we have an option that more flexible so that the API more stable. In other words, in a future version of API, the API’s clients don’t struggle about the breaking changes
package cachev3

import "time"

type RedisCache struct {
    connection string
    db         int
    password   string

    maxRetries      int
    minRetryBackoff time.Duration
    maxRetryBackoff time.Duration

    dialTimeout  time.Duration
    readTimeout  time.Duration
    writeTimeout time.Duration
}

// RedisCache create new redis cache
func NewRedisCache(connection, password string, db int) *RedisCache {
    return &RedisCache{
        connection: connection,
        password:   password,
        db:         db,
    }
}

func NewRedisCacheWithRetryPolicy(
    connection, password string,
    db, maxRetries int,
    minRetryBackoff, maxRetryBackoff time.Duration,
) *RedisCache {
    rc := NewRedisCache(connection, password, db)

    rc.maxRetries = maxRetries
    rc.minRetryBackoff = minRetryBackoff
    rc.maxRetryBackoff = maxRetryBackoff
    return rc
}

func NewRedisCacheWithTimeoutPolicy(
    connection, password string,
    db, maxRetries int,
    dialTimeout, readTimeout, writeTimeout time.Duration,
) *RedisCache {
    rc := NewRedisCache(connection, password, db)
    rc.dialTimeout = dialTimeout
    rc.readTimeout = readTimeout
    rc.writeTimeout = writeTimeout
    return rc
}

func (*RedisCache) Set(key, value string) error {
    return nil
}

func (*RedisCache) Get(key string) (string, error) {
    return "", nil
}
Two solutions above can be applied in some cases it is simple and easy for implementing but it doesn’t flexible because of when you add new arguments you need a new API signature.
The solution is the application of Closure and the High Order Function.
Please read the code then I will explain more about the pattern
fluentcache/cache.go
package fluentcache

import (
	"context"
	"crypto/tls"
	"net"
	"time"

	"github.com/go-redis/redis"
)

type ConfigureFunc = func(redisCache *RedisCache)

type DialerFunc = func(
	ctx context.Context,
	network,
	addr string,
) (net.Conn, error)

type OnConnectFunc = func(conn *redis.Conn) error

type RedisCache struct {
	sentinel   bool
	connection string
	db         int
	password   string

	sentinelAddrs    []string
	masterName       string
	sentinelPassword string

	dialer          DialerFunc
	onConnect       OnConnectFunc
	maxRetries      int
	minRetryBackoff time.Duration
	maxRetryBackoff time.Duration

	dialTimeout  time.Duration
	readTimeout  time.Duration
	writeTimeout time.Duration

	poolSize           int
	minIdleConns       int
	maxConnAge         time.Duration
	poolTimeout        time.Duration
	idleTimeout        time.Duration
	idleCheckFrequency time.Duration

	tLsConfig *tls.Config
}

// RedisCache create new redis cache
func NewRedisCache(configures ...ConfigureFunc) *RedisCache {
	var rc RedisCache
	for _, configure := range configures {
		configure(&rc)
	}
	return &rc
}

func (*RedisCache) Set(key, value string) error {
	return nil
}

func (*RedisCache) Get(key string) (string, error) {
	return "", nil
}
fluentcache/configure.go
package fluentcache
import (
"crypto/tls"
"time"
)
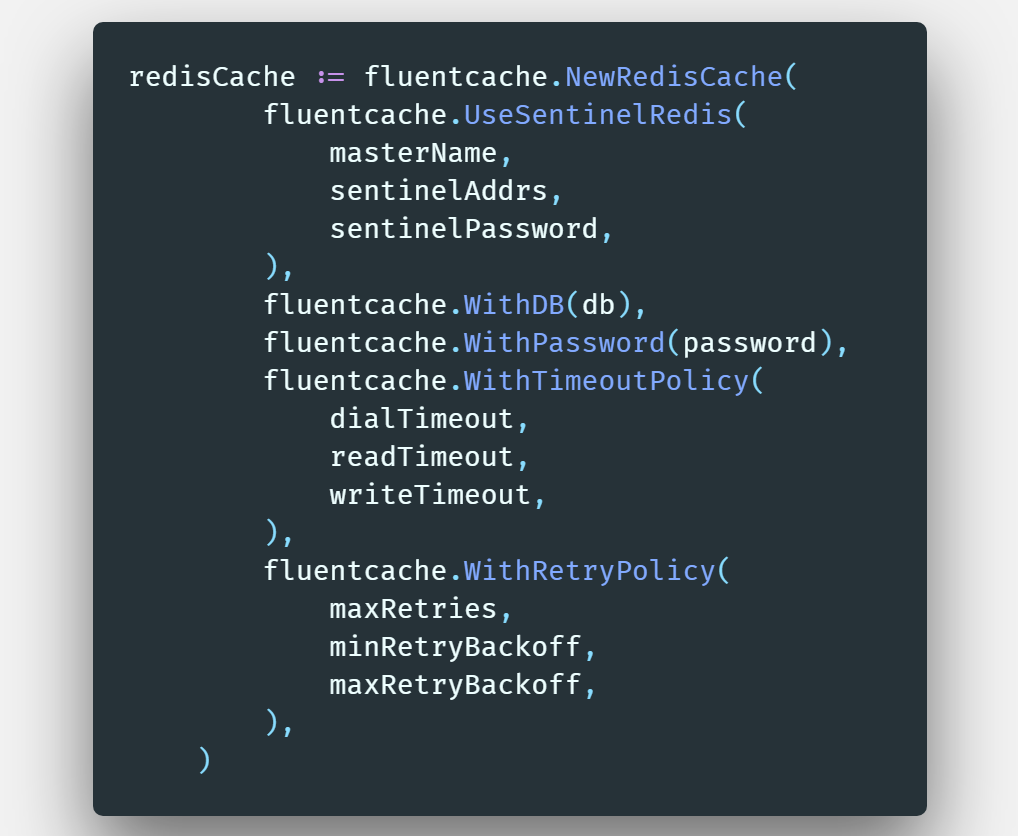
func UseStandalone(connection string) ConfigureFunc {
return func(rc *RedisCache) {
rc.sentinel = false
rc.connection = connection
}
}
func UseSentinelRedis(
masterName string,
sentinelAddrs []string,
sentinelPassword string,
) ConfigureFunc {
return func(rc *RedisCache) {
rc.sentinel = true
rc.masterName = masterName
rc.sentinelAddrs = sentinelAddrs
rc.sentinelPassword = sentinelPassword
}
}
func WithPassword(password string) ConfigureFunc {
return func(rc *RedisCache) {
rc.password = password
}
}
func WithDB(db int) ConfigureFunc {
return func(rc *RedisCache) {
rc.db = db
}
}
func WithDialer(dialer DialerFunc) ConfigureFunc {
return func(rc *RedisCache) {
rc.dialer = dialer
}
}
func OnConnect(onConnectFunc OnConnectFunc) ConfigureFunc {
return func(rc *RedisCache) {
rc.onConnect = onConnectFunc
}
}
func WithRetryPolicy(
maxRetries int,
minRetryBackoff, maxRetryBackoff time.Duration,
) ConfigureFunc {
return func(rc *RedisCache) {
rc.maxRetries = maxRetries
rc.minRetryBackoff = minRetryBackoff
rc.maxRetryBackoff = maxRetryBackoff
}
}
func WithTimeoutPolicy(
dialTimeout, readTimeout, writeTimeout time.Duration,
) ConfigureFunc {
return func(rc *RedisCache) {
rc.dialTimeout = dialTimeout
rc.readTimeout = readTimeout
rc.writeTimeout = writeTimeout
}
}
func WithConnectionPoolPolicy(
poolSize, minIdleConns int,
maxConnAge, poolTimeout, idleTimeout, idleCheckFrequency time.Duration,
) ConfigureFunc {
return func(rc *RedisCache) {
rc.poolSize = poolSize
rc.minIdleConns = minIdleConns
rc.maxConnAge = maxConnAge
rc.poolTimeout = poolTimeout
rc.idleTimeout = idleTimeout
rc.idleCheckFrequency = idleCheckFrequency
}
}
func WithTLSOptions(tlsConfig *tls.Config) ConfigureFunc {
return func(rc *RedisCache) {
rc.tLsConfig = tlsConfig
}
}
As you can see, instead of using many arguments with different types. I only use 1 type is ConfigureFunc with Variadic function.
The ConfigureFunc will take the RedisCache pointer as an argument and then ConfigureFunc can set the value for the RedisCache pointer.
With this pattern, my job is defining the fluent configure functions you can see them in fluentcache/configure.go. My fluent configure functions will return the ConfigureFunc (High Order Function) and the returned ConfigureFunc can access the argument of outer function because of Go has support Closure.
With this pattern you can have some advantages:
This pattern is good but it has some trade off
ConfigureFunc is stateful so it isn’t good if I add new ConfigureFunc without understanding previous ConfigureFunc.The fluent configure pattern is good but it requires extras effort to implement. So I don’t’ use always, I only use it when I see the API may be changed in the future. For example, I design an API for logging and I know I will change the way I log in future then I will use the fluent configure pattern
p.s: This pattern doesn’t new you can see this pattern in some popular package.

I am a developer with a background in .NET. I work mostly on Windows (sometimes I work on MAC but not often). I have used MAC as the main development environment for the last six months and honestly, I like working on MAC much more than Windows and one of the reasons is that MACs terminal is really powerful and it is even cooler when you use ZSH (I will talk about this in another post).
Now I’m using Windows to write this post, just because I’m working on a project that uses .NET technology. (Unfortunately, I don’t use Visual Studio for MAC at all.)
When using a MAC I have some alias (or functions) to speed my development process.
For example, when using GIT I usually update master branch then merge code from the master branch back to a feature branch. In MAC I only type 1 command:
gup master && git merge master
# help me update master branch then switch back
In the code block below the gup command is a function that was added in ~/.bash_profile and it looks like below:
function gup () {
  c=$(git rev-parse --abbrev-ref HEAD)
  git checkout "$1"
  git pull
  git checkout "$c"
}
When switching back to Windows development I felt uncomfortable like missing my pocket knife.

Fortunately, PowerShell has a feature like ~/.bash_profile which is called “PowerShell Profile”. You can read more about “PowerShell Profile” here.
The PowerShell profile basically is a .ps1 file which will be loaded every time you open a PowerShell engine. There are serval profile files and based on your needs you can choose what profile file you want to add to your utility scripts.
| Description | Path |
| All Users, All Hosts | $PsHome\Profile.ps1 |
| All Users, Current Host | $PsHome\Microsoft.PowerShell_profile.ps1 |
| Current User, All Hosts | $Home\[My ]Documents\PowerShell\Profile.ps1 |
| Current user, Current Host | $Home\[My ]Documents\PowerShell |
Host is the interface that the Windows PowerShell engine uses to communicate with the user. For example, the host specifies how prompts are handled between Windows PowerShell and the use.
more
For example, PowerShell.exe in a host and PowerShell in the Visual Studio Code (VSCode) is a different one.
If you encounter an issue that you cannot access some functions in VSCode while you can access it in the PowerShell.exe, you might add the functions in PowerShell.exe host.
Below are some utility functions that I’m using:
# GIT: publish local branch to remote
function gpo() {
    git push origin --set-upstream $(git rev-parse --abbrev-ref HEAD)
}

# GIT: update a branch then switch back to the current branch
function gup () {

    $c=$(git rev-parse --abbrev-ref HEAD)

    git checkout "$1"

    git pull

    git checkout "$c"
}

# GIT: quick command to help your code and push to remote
function gsave() {
    git add .

    $msg=$args[0]

    if ([string]::IsNullOrEmpty($msg)) {
        $msg = "save code"
    }

    git commit -m "$msg"

    gpo
}

# GIT: git fetch from origin with prune flag
function gfo() {
    git fetch origin --prune
}

# GIT: Alias for git commit -m
function gcom() {
    git commit -m $args[0]
}

# GIT: Create directory and cd into it
function mkd {
    New-Item -Path $args[0] -ItemType Directory -Force -Out
    Set-Location $args[0]
}
I’m a lazy developer so I need to reduce some repeated task and PowerShell profile is one of the most useful tools.
If you have used PowerShell profile or PowerShell script file to speed up your development process, please share your utility functions in the comment below.
P.s: the banner of this post I borrowed from https://medium.com/@jsrice7391/using-vsts-for-your-companys-private-powershell-library-e333b15d58c8 😉

When developing a React application using state management system like Redux, you usually use Immutable.JS to make your state not mutable. If you are using VanillaJS you will feel comfortable with the magic string prop name like: `get(“field_name”)` and `set(“field_name”, value)`. However, it is awkward when you are using TypeScript because you will loose the type-checking.
Continue readingYou could be familiar with these two methods of string. And today we are going to dive into them to see what the difference between them is.
IsNullOrEmpty method indicates whether a specified is null or an empty string.IsNullOrWhiteSpace method indicates whether a specified is null, empty, or consists of white-space characters.Let’s take a look at an example below.
static void Main(string[] args)
{
    Console.WriteLine(string.IsNullOrWhiteSpace("\t"));
    Console.WriteLine(string.IsNullOrEmpty("\t"));
    /* Output
    True
    False
    */

    Console.WriteLine(string.IsNullOrWhiteSpace("\n"));
    Console.WriteLine(string.IsNullOrEmpty("\n"));
    /* Output
    True
    False
    */

    Console.WriteLine(string.IsNullOrWhiteSpace(" "));
    Console.WriteLine(string.IsNullOrEmpty(" "));
    /* Output
    True
    False
    */

    Console.WriteLine(string.IsNullOrWhiteSpace(""));
    Console.WriteLine(string.IsNullOrEmpty(""));
    /* Output
    True
    True
    */
}
As you have seen, they returned 2 different results except the last one. In order to clarify this, we are now going to look at its code in more detail.
public static bool IsNullOrEmpty(string value)
{
    if (value != null)
        return value.Length == 0;
    return true;
}

public static bool IsNullOrWhiteSpace(string value)
{
    if (value == null)
        return true;
    for (int index = 0; index < value.Length; ++index)
    {
        if (!char.IsWhiteSpace(value[index]))
            return false;
    }
    return true;
}
As you can see, IsNullOrEmpty method only checks the specified string whether it will be a null value or its length will be zero. So that’s why this method has returned False of 3 cases above. Similarly, IsNullOrWhiteSpace method also makes sure our specified string whether it is null or empty. However, it has a little different from IsNullOrEmpty method is that white-space characters are defined by the Unicode standard. The IsNullOrWhiteSpace method interprets any character that returns a value of true when it is passed to the Char.IsWhiteSpace method as a white-space character. It is kind of useful when we have a method that converts from a string to a number as below. It’s because the condition !string.IsNullOrEmpty(strValue) will return True even if strValue parameter is a white-space or character escape sequences (“\n”, “\t”, …). And we will get an exception once Convert.ToInt32 method is called. And IsNullOrWhiteSpace will address this one.
static void Main(string[] args)
{
    string strValue = "\n";
    ConvertToInt(strValue);
}

public static int ConvertToInt(string strValue)
{
    if (!string.IsNullOrEmpty(strValue))
    {
        // This will throw an exception: System.FormatException: 'Input string was not in a correct format.'
        return Convert.ToInt32(strValue);
    }

    if (!string.IsNullOrWhiteSpace(strValue))
    {
        return Convert.ToInt32(strValue);
    }

    return 0;
}
Let’s see another example below. In order to remove all leading and trailing white-space characters from the current string, we will use Trim method. However, in the case below, we will get an exception since name is null and IsNullOrWhiteSpace works.
static void Main(string[] args)
{
    string name = null;
    GetItemByName(name);
}

public static Item GetItemByName(string name)
{
    if (!string.IsNullOrEmpty(name.Trim()))
    {
        // This will throw an exception: System.NullReferenceException: 'Object reference not set to an instance of an object.'
        return new Item();
    }

    if (!string.IsNullOrWhiteSpace(name))
    {
        return new Item();
    }

    return null;
}
I am showing you how these two methods work. IsNullOrWhiteSpace looks better, however, it depends on our situation what we need to handle and choose which one is suited for us.

Performance is one of the hottest topics in the software development industry. In this post, I would like to share my experience when optimizing a CRM system which serves ~1k requests/second.
Imagine, a CRM system has ~1000 user preferences (e.g. time zone, date format, currency,…), those user preferences are stored in a SQL database, and it will be loaded every single click to reflect the preference of the user. If your web app serves ~1K requests/second, it means there are ~1M requests to the DB per second (in the worst case). At this point, you can see we can improve the performance of the app by reducing the number of requests to the database and it’s time for the caching layer to shine!.
We break down into smaller problems:
UserPreference. It exposed 2 methods: string Get(userId, key) and void Set(userId, key, value). These methods will go to the database to get or set data. How to reduce code rewriting to reduce risks? What is the backup plan if the changes cause problem in production? UserPreference class was shared to many projects (Asp.net web form, Asp.net Web API, Window service, Load balancer nodes…). So, data consistency in distributed environment is a problem. To solve the problem, I create CacheBucket pattern. See the class diagram below:

Imagine, a bucket can contain values (water, sand, oil,…) and it can contain another Bucket. This is the core concept of the CacheBucket pattern.
The CacheBucket pattern includes:
ICacheStorage: An interface which take responsibility to get or set cache data from a storage. (Memory, Redis, file…)Client$: A place which uses the pattern.CacheBucket: Manage inner buckets and cache values, it depends on ICacheStorage.UserPreferenceCacheBucket and BigQueryCacheBucket: Inherit the CacheBucket class for specific ICacheStorage. In detail, the UserPreferenceCacheBucket will use InMemoryCacheStorage. On another hand, the BigQueryCacheBucket will use the RedisCacheStorage.InMemoryCacheStorage and RedisCacheStorage: Implementations of the ICacheBucketOk! Now we will see how the CacheBucket pattern can solve the problem.
First, the CacheBucket class handled all logic about caching management so we just update small code change in the UserPreference class for adding caching into the system. For the backup solution we just add a flag (configurable value) which helps to detect if the caching system is enabled or not. In case there is a problem in production we can switch back to the old code by changing the value of the flag. So, P1 is solved.
Second, to solve the concurrency problem, we should use a centralized cache server such as Redis. Fortunately, with the CacheBucket pattern we can easily change the cache storage by implementing the ICacheStorage interface. So, P2 is solved.
Therefore, the CacheBucket pattern is very easy to extend. For example, if you want to cache the reporting result, all you need is to extend the CacheBucket class.
To do the benchmark, I have created an example project. We can switch between enabling or disabling the cache. So, we can do benchmark the latency of the web application while enable/disabled the caching layer.
For the tool, I used the WRK (a HTTP Benchmarking tool) to simulate 200 connections (users) with this command:
wrk -t2 -c200 -d60s --timeout 3s http://cachebucket.com:5000/\?user_id\=1
When the caching layer is enabled, the latency is 465.46 ms and the web app can response 481.27 requests/sec. On another hand, the latency is 658.68 ms and 305.73 requests/sec when the caching layer is disabled. You can see more details below:


To use CacheBucket pattern you need to install packages from NuGet.
There are 3 packages:
CacheBucket.Core contains the core of cache bucket. In theory, you can use cache bucket pattern with this package only. However, for more convenience, you can consider other 2 packages below.CacheBucket.InMemory contains an InMemoryCacheStorage which is an implementation of ICacheStorage to store cache data in memory.CacheBucket.Factory contains some helper classes and extension methods that help to create a CacheBucket inline code. e.g: CacheBucketFactory.Create("UserPreference:1")This is an example command to install CacheBucket.Core in “Package Management Tools”
Install-Package CacheBucket.Core #replace CacheBucket.Core by another package name to install another package.or if you prefer the dotnet command:
dotnet add package CacheBucket.CoreBecause of the CacheBucket class is open for extending you can create a derived class as the sample code below:
using CB.Core;
using CB.InMemory;

namespace WebApplication.Helpers {
    public class UserPreferenceCacheBucket : CacheBucket {
        public const string NAME = "UserPreference";

        public UserPreferenceCacheBucket (InMemoryCacheStorage cacheStorage) : base (NAME, cacheStorage) { }
    }
}
And then you can inject the UserPreferenceCacheBucket class into a client:
using CB.Core;
using WebApplication.Data;
using WebApplication.Data.Models;

namespace WebApplication.Helpers {
    public class UserPreferenceHelper {
        private readonly UserPreferenceCacheBucket _cacheBucket;
        private readonly ApplicationDbContext _dbContext;

        // The UserPrefrenceCacheBucket can be inject by IoC container.
        public UserPreferenceHelper (UserPreferenceCacheBucket cacheBucket, ApplicationDbContext dbContext) {
            _cacheBucket = cacheBucket;
            _dbContext = dbContext;
        }

        public string Get (int userId, string key) {
            CacheBucket userBucket = null;
            if (MvcApplication.EnableCacheBucket) {
                userBucket = _cacheBucket.In (userId.ToString ());

                // get cache value.
                var cacheValue = userBucket.GetValue (key);

                if (string.IsNullOrEmpty (cacheValue) == false) {
                    return cacheValue;
                }
            }

            // get db value.
            UserPreference userPreference = GetUserPreference (userId, key);

            if (userPreference == null) {
                return null;
            }

            // set into cache.
            userBucket?.SetValue (key, userPreference.Value);

            return userPreference.Value;
        }

        /// ...
    }
}Overall, the caching layer is simple and easy to apply but effective. You don’t need to use CacheBucket to apply caching layer, you can apply the caching pattern in your own way as long as it is the most effective way for your situation.
This is my personal experience. If you have any better way, please share it on the comments, and we can discuss later😜