Blog

Fluent configure pattern in Golang

Photo by Caspar Camille Rubin on Unsplash

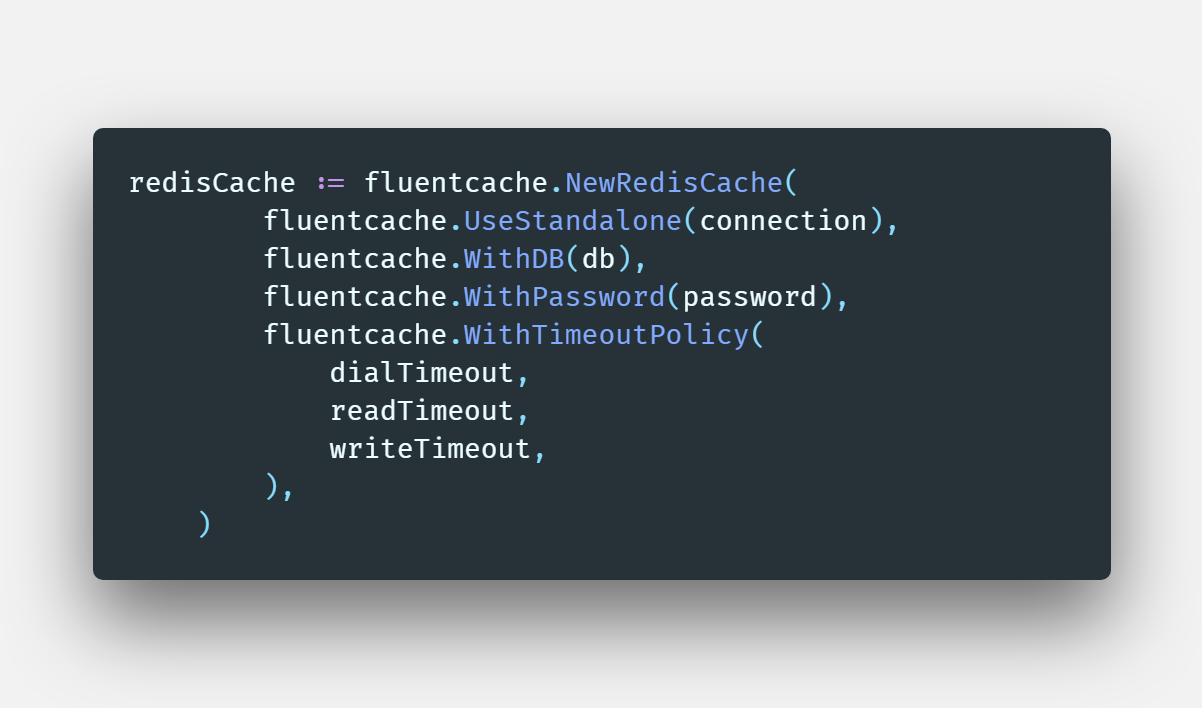
In this post, I want to share a pattern that helps in configure/construct a service. You can see the final result code first for easier to get the context

package main

import (
	"time"

	"github.com/jkaveri/fluent-option/fluentcache"
)

func main() {
	connection := "localhost"
	password := "JA$2mAe%1@s5"
	db := 0
	readTimeout := 2 * time.Second
	writeTimeout := 2 * time.Second
	dialTimeout := 5 * time.Second

        // Configure redis cache fluent
	redisCache := fluentcache.NewRedisCache(
		fluentcache.UseStandalone(connection),
		fluentcache.WithDB(db),
		fluentcache.WithPassword(password),
		fluentcache.WithTimeoutPolicy(
			dialTimeout,
			readTimeout,
			writeTimeout,
		),
	)

	// set key
	_ = redisCache.Set("my_key", "my_value")
}

Problem

When design API in Golang I usually create a function that helps to configure the service.

// cache/cache.go
package cache

type RedisCache struct {
	connection string
	db         int
	password   string
}

// RedisCache create new redis cache
func NewRedisCache(connection, password string, db int) *RedisCache {
	return &RedisCache{
		connection: connection,
		password:   password,
		db:         db,
	}
}

func (*RedisCache) Set(key, value string) error {
	return nil
}

func (*RedisCache) Get(key string) (string, error) {
	return "", nil
}

I skipped some implementation detail to keep the code simple, you only need to focus the NewRedisCache function

Then I can init my RedisCache like this:

// main.go
package main

import "github.com/jkaveri/fluent-option/cache"

func main() {
	connection := "localhost"
	password := "JA$2mAe%1@s5"
	db := 0

	redisCache := cache.NewRedisCache(connection, password, 0)

	// set key
	_ = redisCache.Set("my_key", "my_value")
}

The configure looks good enough and I started to use that configure function in many places. Unfortunately, I was got a problem when I want to add more argument into the configure function because of I want to add more feature for my service, the problems are:

So we only have these options:

  • Add new arguments into existing function and update existing code. This option is worse because of that impact on the existing code. Furthermore, in case your API is the dependency of other packages and this option can is a breaking change

    // cachev2.go
    package cachev2
    
    import "time"
    
    type RedisCache struct {
        connection string
        db         int
        password   string
    
        maxRetries      int
        minRetryBackoff time.Duration
        maxRetryBackoff time.Duration
    }
    
    // RedisCache create new redis cache
    func NewRedisCache(
        connection, password string,
        db, maxRetries int,
        minRetryBackoff, maxRetryBackoff time.Duration,
    ) *RedisCache {
    
        return &RedisCache{
            connection:      connection,
            password:        password,
            db:              db,
            maxRetries:      maxRetries,
            minRetryBackoff: minRetryBackoff,
            maxRetryBackoff: maxRetryBackoff,
        }
    }
    
    func (*RedisCache) Set(key, value string) error {
        return nil
    }
    
    func (*RedisCache) Get(key string) (string, error) {
        return "", nil
    }
    
  • Create a new function with meaning name, creating a new function makes sense but what if we will need more arguments in future? Of course, you can say we need compliance with YAGNI, but sometimes if we have an option that more flexible so that the API more stable. In other words, in a future version of API, the API’s clients don’t struggle about the breaking changes

    package cachev3
    
    import "time"
    
    type RedisCache struct {
        connection string
        db         int
        password   string
    
        maxRetries      int
        minRetryBackoff time.Duration
        maxRetryBackoff time.Duration
    
        dialTimeout  time.Duration
        readTimeout  time.Duration
        writeTimeout time.Duration
    }
    
    // RedisCache create new redis cache
    func NewRedisCache(connection, password string, db int) *RedisCache {
        return &RedisCache{
            connection: connection,
            password:   password,
            db:         db,
        }
    }
    
    func NewRedisCacheWithRetryPolicy(
        connection, password string,
        db, maxRetries int,
        minRetryBackoff, maxRetryBackoff time.Duration,
    ) *RedisCache {
        rc := NewRedisCache(connection, password, db)
    
        rc.maxRetries = maxRetries
        rc.minRetryBackoff = minRetryBackoff
        rc.maxRetryBackoff = maxRetryBackoff
        return rc
    }
    
    func NewRedisCacheWithTimeoutPolicy(
        connection, password string,
        db, maxRetries int,
        dialTimeout, readTimeout, writeTimeout time.Duration,
    ) *RedisCache {
        rc := NewRedisCache(connection, password, db)
        rc.dialTimeout = dialTimeout
        rc.readTimeout = readTimeout
        rc.writeTimeout = writeTimeout
        return rc
    }
    
    func (*RedisCache) Set(key, value string) error {
        return nil
    }
    
    func (*RedisCache) Get(key string) (string, error) {
        return "", nil
    }
    

Two solutions above can be applied in some cases it is simple and easy for implementing but it doesn’t flexible because of when you add new arguments you need a new API signature.

Solution

The solution is the application of Closure and the High Order Function.

Please read the code then I will explain more about the pattern

fluentcache/cache.go

package fluentcache

import (
	"context"
	"crypto/tls"
	"net"
	"time"

	"github.com/go-redis/redis"
)

type ConfigureFunc = func(redisCache *RedisCache)

type DialerFunc = func(
	ctx context.Context,
	network,
	addr string,
) (net.Conn, error)

type OnConnectFunc = func(conn *redis.Conn) error

type RedisCache struct {
	sentinel   bool
	connection string
	db         int
	password   string

	sentinelAddrs    []string
	masterName       string
	sentinelPassword string

	dialer          DialerFunc
	onConnect       OnConnectFunc
	maxRetries      int
	minRetryBackoff time.Duration
	maxRetryBackoff time.Duration

	dialTimeout  time.Duration
	readTimeout  time.Duration
	writeTimeout time.Duration

	poolSize           int
	minIdleConns       int
	maxConnAge         time.Duration
	poolTimeout        time.Duration
	idleTimeout        time.Duration
	idleCheckFrequency time.Duration

	tLsConfig *tls.Config
}

// RedisCache create new redis cache
func NewRedisCache(configures ...ConfigureFunc) *RedisCache {
	var rc RedisCache
	for _, configure := range configures {
		configure(&rc)
	}
	return &rc
}

func (*RedisCache) Set(key, value string) error {
	return nil
}

func (*RedisCache) Get(key string) (string, error) {
	return "", nil
}

fluentcache/configure.go

package fluentcache

import (
	"crypto/tls"
	"time"
)

func UseStandalone(connection string) ConfigureFunc {
	return func(rc *RedisCache) {
		rc.sentinel = false
		rc.connection = connection
	}
}

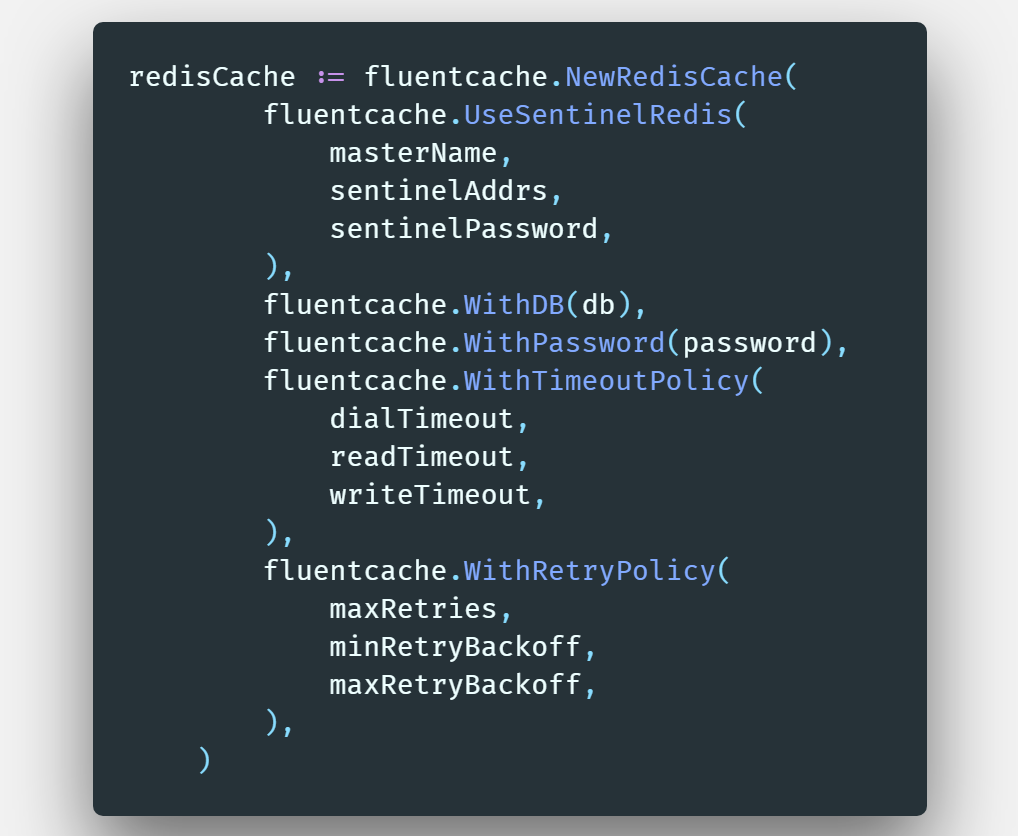
func UseSentinelRedis(
	masterName string,
	sentinelAddrs []string,
	sentinelPassword string,
) ConfigureFunc {
	return func(rc *RedisCache) {
		rc.sentinel = true
		rc.masterName = masterName
		rc.sentinelAddrs = sentinelAddrs
		rc.sentinelPassword = sentinelPassword
	}
}

func WithPassword(password string) ConfigureFunc {
	return func(rc *RedisCache) {
		rc.password = password
	}
}

func WithDB(db int) ConfigureFunc {
	return func(rc *RedisCache) {
		rc.db = db
	}
}

func WithDialer(dialer DialerFunc) ConfigureFunc {
	return func(rc *RedisCache) {
		rc.dialer = dialer
	}
}

func OnConnect(onConnectFunc OnConnectFunc) ConfigureFunc {
	return func(rc *RedisCache) {
		rc.onConnect = onConnectFunc
	}
}

func WithRetryPolicy(
	maxRetries int,
	minRetryBackoff, maxRetryBackoff time.Duration,
) ConfigureFunc {
	return func(rc *RedisCache) {
		rc.maxRetries = maxRetries
		rc.minRetryBackoff = minRetryBackoff
		rc.maxRetryBackoff = maxRetryBackoff
	}
}

func WithTimeoutPolicy(
	dialTimeout, readTimeout, writeTimeout time.Duration,
) ConfigureFunc {
	return func(rc *RedisCache) {
		rc.dialTimeout = dialTimeout
		rc.readTimeout = readTimeout
		rc.writeTimeout = writeTimeout
	}
}

func WithConnectionPoolPolicy(
	poolSize, minIdleConns int,
	maxConnAge, poolTimeout, idleTimeout, idleCheckFrequency time.Duration,
) ConfigureFunc {
	return func(rc *RedisCache) {
		rc.poolSize = poolSize
		rc.minIdleConns = minIdleConns
		rc.maxConnAge = maxConnAge
		rc.poolTimeout = poolTimeout
		rc.idleTimeout = idleTimeout
		rc.idleCheckFrequency = idleCheckFrequency
	}
}

func WithTLSOptions(tlsConfig *tls.Config) ConfigureFunc {
	return func(rc *RedisCache) {
		rc.tLsConfig = tlsConfig
	}
}

As you can see, instead of using many arguments with different types. I only use 1 type is ConfigureFunc with Variadic function.

The ConfigureFunc will take the RedisCache pointer as an argument and then ConfigureFunc can set the value for the RedisCache pointer.

With this pattern, my job is defining the fluent configure functions you can see them in fluentcache/configure.go. My fluent configure functions will return the ConfigureFunc (High Order Function) and the returned ConfigureFunc can access the argument of outer function because of Go has support Closure.

With this pattern you can have some advantages:

  • Configure service fluently configure fluently
  • Flexible API and reduce breaking changes flexible API and reduce breaking changes
  • Can be used for optional argument with a default value

Tradeoff

This pattern is good but it has some trade off

  • The configure function will not clear with API consumer. I need document it carefully to help API consumer know what API supports
  • ConfigureFunc is stateful so it isn’t good if I add new ConfigureFunc without understanding previous ConfigureFunc.

Conclusion

The fluent configure pattern is good but it requires extras effort to implement. So I don’t’ use always, I only use it when I see the API may be changed in the future. For example, I design an API for logging and I know I will change the way I log in future then I will use the fluent configure pattern

p.s: This pattern doesn’t new you can see this pattern in some popular package.

Using PowerShell profile as to speed up your development process

I am a developer with a background in .NET. I work mostly on Windows (sometimes I work on MAC but not often). I have used MAC as the main development environment for the last six months and honestly, I like working on MAC much more than Windows and one of the reasons is that MACs terminal is really powerful and it is even cooler when you use ZSH (I will talk about this in another post).

Now I’m using Windows to write this post, just because I’m working on a project that uses .NET technology. (Unfortunately, I don’t use Visual Studio for MAC at all.)

Problem

When using a MAC I have some alias (or functions) to speed my development process.

For example, when using GIT I usually update master branch then merge code from the master branch back to a feature branch. In MAC I only type 1 command:

gup master && git merge master
# help me update master branch then switch back
 

In the code block below the gup command is a function that was added in ~/.bash_profile and it looks like below:


function gup () {
  c=$(git rev-parse --abbrev-ref HEAD)
  git checkout "$1"
  git pull
  git checkout "$c"
}

When switching back to Windows development I felt uncomfortable like missing my pocket knife.

Solutions

Fortunately, PowerShell has a feature like ~/.bash_profile which is called “PowerShell Profile”. You can read more about “PowerShell Profile” here.

The PowerShell profile basically is a .ps1 file which will be loaded every time you open a PowerShell engine. There are serval profile files and based on your needs you can choose what profile file you want to add to your utility scripts.

DescriptionPath
All Users, All Hosts $PsHome\Profile.ps1
All Users, Current Host $PsHome\Microsoft.PowerShell_profile.ps1
Current User, All Hosts $Home\[My ]Documents\PowerShell\Profile.ps1
Current user, Current Host $Home\[My ]Documents\PowerShell

Host is the interface that the Windows PowerShell engine uses to communicate with the user. For example, the host specifies how prompts are handled between Windows PowerShell and the use.

more

For example, PowerShell.exe in a host and PowerShell in the Visual Studio Code (VSCode) is a different one.

If you encounter an issue that you cannot access some functions in VSCode while you can access it in the PowerShell.exe, you might add the functions in PowerShell.exe host.

Bonus

Below are some utility functions that I’m using:


# GIT: publish local branch to remote
function gpo() {
    git push origin --set-upstream $(git rev-parse --abbrev-ref HEAD)
}

# GIT: update a branch then switch back to the current branch
function gup () {

    $c=$(git rev-parse --abbrev-ref HEAD)
  
    git checkout "$1"
  
    git pull
  
    git checkout "$c"
}
  
# GIT: quick command to help your code and push to remote
function gsave() {
    git add .

    $msg=$args[0]
    
    if ([string]::IsNullOrEmpty($msg)) {
        $msg = "save code"
    }
  
    git commit -m "$msg"
  
    gpo
}

# GIT: git fetch from origin with prune flag
function gfo() {
    git fetch origin --prune
}

# GIT: Alias for git commit -m
function gcom() {
    git commit -m $args[0]
}

# GIT: Create directory and cd into it
function mkd {
    New-Item -Path $args[0] -ItemType Directory -Force -Out
    Set-Location $args[0]   
}

Conclusion

I’m a lazy developer so I need to reduce some repeated task and PowerShell profile is one of the most useful tools.

If you have used PowerShell profile or PowerShell script file to speed up your development process, please share your utility functions in the comment below.

P.s: the banner of this post I borrowed from https://medium.com/@jsrice7391/using-vsts-for-your-companys-private-powershell-library-e333b15d58c8 😉

Visual Studio 2017: Tạo Bộ Cài Đặt Offline + Key Bản Quyền

Cách tạo bộ cài đặt Offline và key active Visual Studio 2017. Tôi xin chi sẻ cách tạo bộ cài đặt Offline Visual Studio 2017 và Key bản quyền.

Các bạn có thể tải về Visual Studio 2017 tại link sau đây. Mặc định Visual Studio 2017 là bản cài đặt online, ngĩa là bạn cần internet để có thể tải về các gói cài đặt cần thiết cho tất cả các lần cài đặt.

Tải xuống Visual Studio 2017

Tạo bộ cài đặt Offline cho VS 2017 là một hình thức tải về các tập tin cài đặt cần thiết duy nhất một lần và sử dụng được cho các lần cài đặt sau mà không cần internet, và chúng ta sẽ phải sử dụng installer tương ứng mà bạn đã tải về từ trước tại trang chủ Miscrosoft.

Để tạo bộ cài offline, trước tiên các bạn tải về phiên bản mà bạn cần và nhớ nơi lưu trữ nó.

Ví dụ tôi tải về VS 2017 phiên bản Professional, tập tin installer được lưu tại “D:\Download \vs_professional.exe”

Sau khi tải xong tôi tiến hành tạo bộ cài đặt như sau. Hãy mở hộp thoại CMD lên và chạy tuần tự các đoạn lệnh sau.


cd /d "D:\Download"


vs_professional.exe --layout D:\vs2017offline --lang en-US


Đôi khi tân tập tin installer bạn tải về sẽ có dạng vs_professional__XXX, hãy đổi tên dòng command trên cho phù hợp.

Đợi hộp thoại sau hiện ra.

Sau đó chương trình sẽ tự động tải về bộ cài đặt với ngôn ngữ en-US. Tất cả các file sẽ được lưu ở D:\vs2017offline

Sau khi tải về hoàn tất, bạn chỉ việc sử dụng thư mục D:\vs2017offline để cài VS 2017.

Mặc định khi chạy command trên, bạn sẽ nhận được full bộ installer từ Microsoft. Để tùy chỉnh bộ cài đặt này các bạn có thể xem thêm tại đây.

Các bạn có thể active VS 2017 với key sau đây:

Visual studio 2017 professional key: KBJFW-NXHK6-W4WJM-CRMQB-G3CDH

Visual studio Enterprise Key: NJVYC-BMHX2-G77MM-4XJMR-6Q8QF

Visual studio Pro Keys

KBJFW-NXHK6-W4WJM-CRMQB-G3CDH OR HMGNV-WCYXV-X7G9W-YCX63-B98R2

//ST

[Angular] ViewChild annotation returns undefined

While working on developing my own Web app, I got an issue with ViewChild annotation that always returns an object of undefined. I did an investigation and found out the problem is that I used ngIf directive within the component. Let’s see an example below and we are going to deeply dive into this one.

import { Component, ElementRef, ViewChild, AfterViewInit } from '@angular/core';

@Component({
  selector: 'app-my-component',
  template: `
    <div>
      <div>
          <input [(ngModel)]="inputValue" />
      </div>
      <div *ngIf="inputValue">
          <button #myButton>Click me</button>
      </div>
    </div>
  `
})

export class MyComponentComponent implements AfterViewInit {
  @ViewChild('myButton') button: ElementRef;

  constructor() { }

  ngAfterViewInit(): void {
    console.log(this.button);
    /*
    Result: undefined
    */
  }
}

Suppose I have an input field, and a button will be hidden by default. The button will only appear when the user types something in the text box to allow the user to click on it. In reality, we’re going to do other stuff. But in the case of this example, I’m using console.log(); to see the value of the element since I just wanted to show you the issue between ViewChild annotation and ngIf directive what I’m talking about. And the result of this console.log(this.button); is clearly undefined because the button element will not be created if the inputValue is null, it’s because ngIf directive will shape or reshape the DOM’s structure by adding or removing elements. And in this case, it’s not added yet. That’s why we got an object of undefined of the ViewChild.

So how will we fix that? We have two solutions for this one. Using hidden or style.display attribute.

Solution #1: Hidden attribute.

Instead of using ngIf directive, we now switch to use hidden attribute. Update the HTML code in the template, it is going to be changed like this. Since using the hidden attribute, the element is still generated in the DOM, and it’s just hidden from the UI so that the user will not see it.

<div>
    <div>
        <input [(ngModel)]="inputValue" />
    </div>
    <div [hidden]="!inputValue">
        <button #myButton>Click me</button>
    </div>
</div>

Solution #2: Style.display attribute

We’re going to bind display method to style.display attribute. In the class of ts file, display method will return a value of block or none that depends on inputValue. And the user will not see the button if display method returns block.

import { Component, ElementRef, ViewChild, AfterViewInit } from '@angular/core';

@Component({
  selector: 'app-my-component',
  template: `
    <div>
      <div>
          <input [(ngModel)]="inputValue" />
      </div>
      <div [style.display]="display()">
          <button #myButton>Click me</button>
      </div>
    </div>
  `
})

export class MyComponentComponent implements AfterViewInit {
  inputValue: string;
  @ViewChild('myButton') button: ElementRef;

  constructor() { }

  ngAfterViewInit(): void {
    console.log(this.button);
    /*
    Result: undefined
    */    
  }

  display(): string {
    if (this.inputValue) {
      return 'block';
    } else {
      return 'none';
    }
  }
}

Conclusions

Since the ngIf won’t add the element in if the expression is false. So the two solutions above are just to hide button from the UI in order for us to be able to get the Element from ViewChild.
Hope this helps you guys who have the same issue. If you have any questions or other workarounds, please add it to comment below.

Type-checking ImmutableJS with TypeScript

When developing a React application using state management system like Redux, you usually use Immutable.JS to make your state not mutable. If you are using VanillaJS you will feel comfortable with the magic string prop name like: `get(“field_name”)` and `set(“field_name”, value)`. However, it is awkward when you are using TypeScript because you will loose the type-checking.

Continue reading

Unable to start IIS Application Pool after upgrade to windows 10 Fall Creator

Problem #

After upgrading to the Windows 10 Fall Creator. I got the message below when I tried to access my IIS site


Service Unavailable HTTP Error 503. The service is unavailable.

and you may see the error below in windows event viewer:

error log

Solution #

To solve the problem you can follow these steps:

  1. Open a Windows PowerShell window by using the Run as administrator option.
  2. Run these commands:
Stop-Service -Force WAS
Remove-Item -Recurse -Force C:\inetpub\temp\appPools\*
Start-Service W3SVC

For more detail, please refer to this link: https://goo.gl/uH8o9n