
If you like working with command-line tools you should work on *nix system. But if your work requires you to work on Windows like me you may find it helpful reading this post.
In this post, I would like to show some opinionated steps to make Terminal on Window look & feel better as well as increase your productivity.
- Install Windows Terminal
- Set up Windows Sub-system Linux
- Install OhMyZSH
- Customize Windows Terminal
Install Terminal
Windows Terminal is a new, modern, feature-rich, productive terminal application for command-line users. It includes many of the features most frequently requested by the Windows command-line community including support for tabs, rich text, globalization, configurability, theming & styling, and more.
https://github.com/microsoft/terminal#windows-terminal
You can install Windows Terminal in two ways:
- Windows Store App
- Chocolately Install Chocolately
choco install microsoft-windows-terminal
Set up Linux inside Windows
Fortunately, you can use Linux comand-lines by using the Windows Subsystem for Linux.
You can follow this intrustion to set up Windows Subsystem for Linux.
There are some limitations of WSL such as:
- You cannot run ALL Linux app on WSL because it isn’t a real Linux kernel (it is just a Linux interface mapping for Windows)
- File IO perfomance isn’t good
However, with the WSL 2 you can work on real Linux inside Windows completely with better file IO performance. You can access the WSL 2 now through the Windows insider program (fast).
Note: I’m using WSL 1 while writing this post.
Install OhMyZSH
The OhMyZSH works fine in WSL and you can install it by the script below (run in a WSL command line)
sh -c "$(curl -fsSL https://raw.github.com/robbyrussell/oh-my-zsh/master/tools/install.sh)"
Note: If you got an error about missing curl command line you need to install it based on your distro.
Customize Windows Terminal
Install a monospaced font
Because of some themes of ohmyzsh use monospaced font so you need to install it before enabling the theme. I have used Fira Code font for a long time and I really like it. You can follow this link to install Fira Code on Windows.
Create a custom Windows Terminal profile
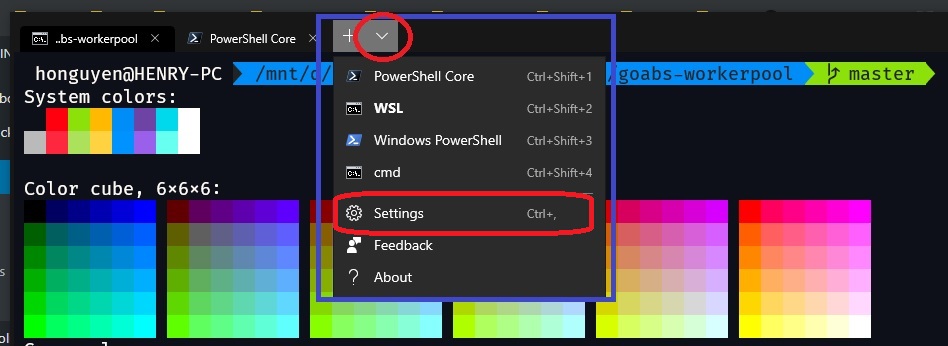
You create/edit profile of Windows Terminal by editing a profiles.json file. You can open the profiles.json as the image below.
The profiles.json file has a structure like this:
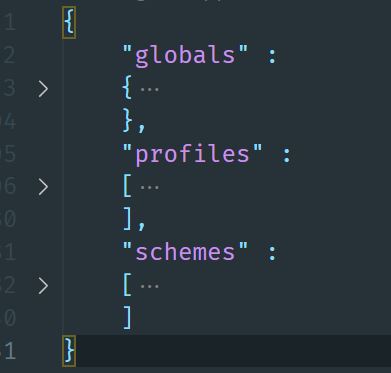
globalssection contains Windows Terminal’s general settings likedefaultProfilekeybindingsprofiles: contains a list of profile settingsschemes: contains a list of color schemes which will be used in profile
To create a custom profile you can do by these steps:
- Create a color scheme named Argonaut by copy the json object below into the
schemessections in theprofiles.json
{
  "background" : "#0E1019",
  "black" : "#232323",
  "blue" : "#008DF8",
  "brightBlack" : "#BABABA",
  "brightBlue" : "#0092FF",
  "brightCyan" : "#67FFF0",
  "brightGreen" : "#ABE15B",
  "brightPurple" : "#9A5FEB",
  "brightRed" : "#FF2740",
  "brightWhite" : "#FFFFFF",
  "brightYellow" : "#FFD242",
  "cyan" : "#00D8EB",
  "foreground" : "#FFFAF4",
  "green" : "#8CE10B",
  "name" : "Argonaut",
  "purple" : "#6D43A6",
  "red" : "#FF000F",
  "white" : "#FFFFFF",
  "yellow" : "#FFB900"
}
You can find another color scheme at this link
- Create a new profile for WSL by adding the json below into
profilessection
        {
            "acrylicOpacity" : 0.75,
            "closeOnExit" : true,
            "colorScheme" : "Argonaut",
            "commandline" : "C:\\Windows\\System32\\wsl.exe",
            "cursorColor" : "#FFFFFF",
            "cursorShape" : "bar",
            "fontFace" : "Fira Code Retina",
            "fontSize" : 14,
            "guid" : "{a3240086-20d1-46a2-a0da-0c71e7c86908}",
            "historySize" : 9001,
            "icon" : "ms-appx:///ProfileIcons/{0caa0dad-35be-5f56-a8ff-afceeeaa6101}.png",
            "name" : "WSL",
            "padding" : "10, 10, 10, 10",
            "snapOnInput" : true,
            "startingDirectory" : "C:/",
            "useAcrylic" : true
        }
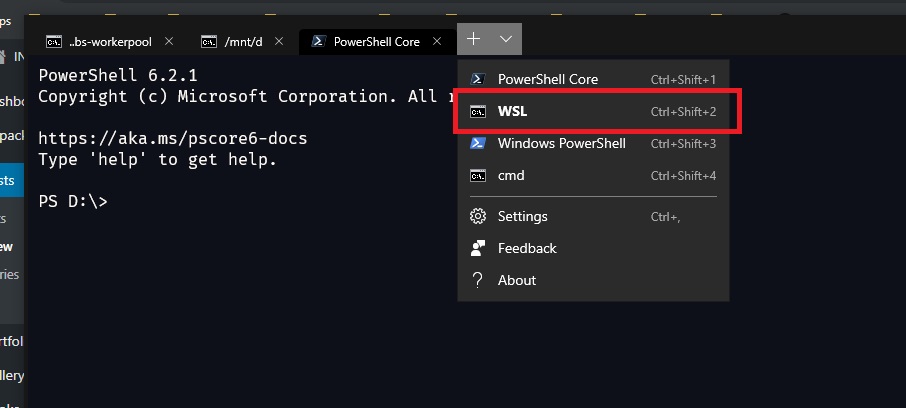
Now you need to save the profiles.json file then close and open the Windows Terminal again to apply new settings.
You can try the new profile now.
ZSH settings
We will edit the ~/.zshrc file to update some zsh settings. You can use vim in WSL Terminal to edit
vim ~/.zshrc
or you can use the VSCode to edit ~/.zshrc. To use edit code for editing file in WSL you need to:
- Install VSCode
- Install Remote – WSL extension
- In the WSL terminal, type this command:
code ~/.zshrc
When the ~/.zshrc file is opened in editor you need to:
- find and update the variable
ZSH_THEME="agnoster". (You can choose another theme in the list https://github.com/robbyrussell/oh-my-zsh/wiki/Themes - find and update
pluginsvariable toplugins=(git zsh-syntax-highlighting)or you can enable adding more plugins https://github.com/robbyrussell/oh-my-zsh/tree/master/plugins
You can save and close edit at this point. However, I would like to introduce some alias that I use daily for development.
alias gco='git checkout'
alias gfo='git fetch origin --prune'
alias gcom='git commit -m'
alias gpo='git push origin --set-upstream $(git rev-parse --abbrev-ref HEAD)'
alias gstash='git stash'
alias gstashpop='git stash pop'

function gup () {
  c=$(git rev-parse --abbrev-ref HEAD)
  git checkout "$1"
  git pull
  git checkout "$c"
}

function gsave() {
  git add .
  msg=$1
  if [[ -z $msg ]]; then
    msg="save code"
  fi
  git commit -m "$msg"
  gpo
}
# reset git repo with its submodules
function git_reset_repo() {
  git clean -xfd
  git submodule foreach --recursive git clean -xfd
  git reset --hard
  git submodule foreach --recursive git reset --hard
  git submodule update --init --recursive
}

# Make directory and enter it
function mkd () {
  mkdir -p "$@" && cd "$_";
}
Conclusion
Please let me know if you have any hiccups when following the steps above.